First-time configuration
RPFM works on Pack files, but most of the interesting features — diagnostics, dependency lookups, MyMod, the optimiser — only work properly when RPFM knows where your games live and which schemas to use. The first-time configuration takes about a minute and unlocks everything.
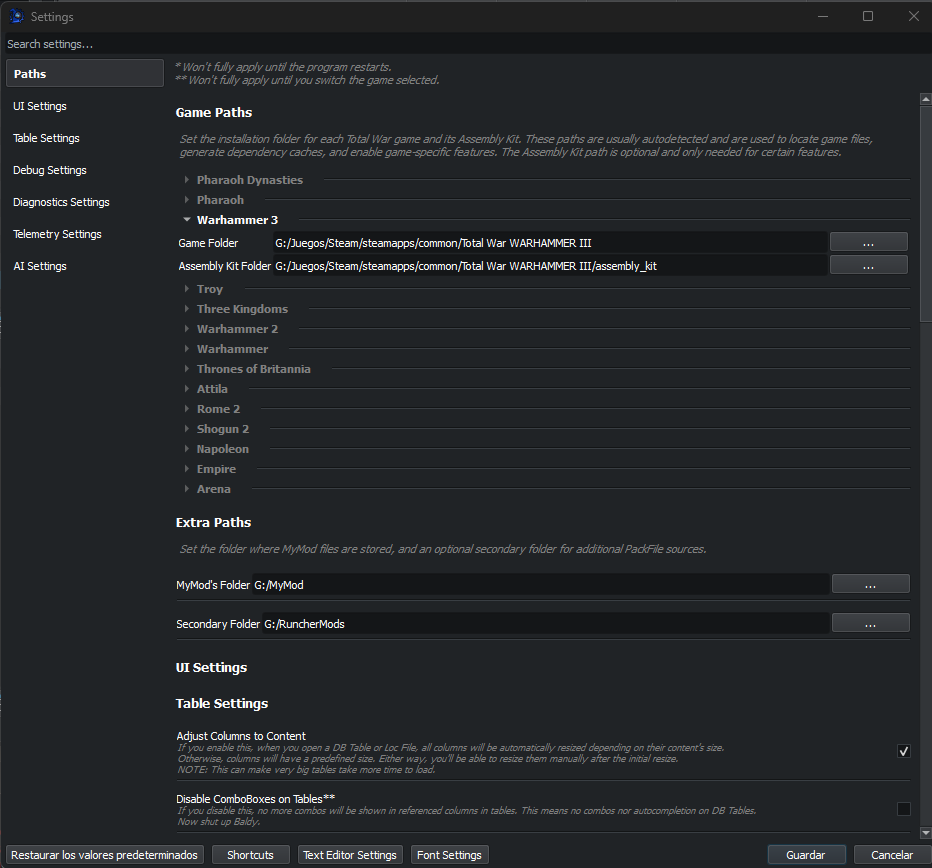
Open Preferences (Edit → Preferences, or Ctrl+P then “Preferences”). Settings are laid out as a single scrollable list grouped into sections — Paths, General, Table, Debug, Diagnostics, Telemetry, AI — with a search field at the top you can use to jump straight to a setting by name.
1. Set the game paths
In the Paths section, point RPFM at every Total War game install you care about. For each game, browse to the folder that contains the game’s executable (e.g. …/steamapps/common/Warhammer 3 for Warhammer 3).
On first launch RPFM scans your Steam libraries and fills in the game (and Assembly Kit) paths it finds automatically, so in most cases you just need to check the list and fill any gaps by hand. Autodetection only runs when a path is empty — it never overwrites one you’ve set yourself — and it only covers Steam installs, so non-Steam copies still need to be pointed at manually.
You don’t have to fill in all of them — only the ones you mod. Empty entries are fine.
RPFM uses these paths to:
- Load vanilla data for reference lookups, diagnostics and ITM detection.
- Run the optimizer and the Tools (Faction Painter, Unit Editor, Translator) against a real game install.
- Resolve where MyMod installs its packs.
You can still switch to a game that has no path set, but anything that reads vanilla data (diagnostics, dependency cache, optimizer, Tools, MyMod install) will either fail or produce empty/false results until you point RPFM at the install.
2. Pick a default game
Still in Preferences, in the General section, set Default Game. RPFM will switch to that game on launch and treat its schema as the active one. You can change the active game later from the Game Selected menu — see The main window.
3. Set the MyMod and Secondary paths
Two workspace paths live in the Paths section:
- MyMod Base Path — folder where all your MyMod projects live. RPFM will create one subfolder per game inside it (e.g.
MyMod/warhammer_3/,MyMod/three_kingdoms/). If you don’t plan to use MyMod, you can skip this — but most non-trivial mod projects benefit from the workspace structure MyMod provides. See What is MyMod?. - Secondary Folder — folder where mod launchers (Runcher and any other launcher that supports this feature) store the mods they manage, outside the game’s
/dataand/contentdirectories. Pointing RPFM at it populates the Pack → Open From Secondary submenu with the Packs in that folder, so you can open them without digging through the filesystem. Skip it if your launcher doesn’t support a secondary folder.
4. Download or check schemas
Schemas are the per-game definitions RPFM uses to decode DB tables. They don’t ship with the program — they’re pulled in through the Update Manager, and they need updating every time Creative Assembly patches a game.
From the menu bar, run About → Check Updates. The Update Manager handles the program itself, schemas, and a couple of other auxiliary data sets (Lua autogen, Empire/Napoleon AK) from one dialog, with a button per component; press the schemas one to fetch the latest set from the rpfm-schemas repo. Do this on first launch to get the initial schemas, and again whenever a Total War game gets a content patch.
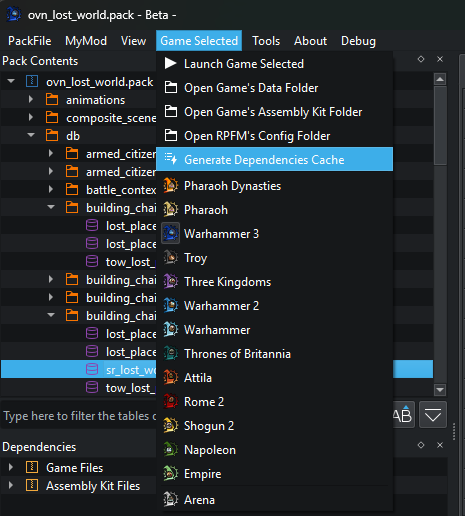
5. (Optional) Generate the dependency cache
Diagnostics, references and the dependency manager are dramatically more useful with a dependencies cache of the vanilla game files for the active game. Generate it once per game:
Game Selected → Generate Dependencies Cache
Generating it can take a few minutes — RPFM is reading and indexing every vanilla Pack. The cache is automatically invalidated whenever the game updates, so you’ll need to regenerate it after every patch.
6. (Optional) Set up the Assembly Kit (where supported)
Some tables — units, buildings, technologies — only exist in the Assembly Kit and not in the game’s Pack files. If you want diagnostics and references to cover those too:
- Install the Assembly Kit for the game from Steam (look for “Assembly Kit” or “Mod Tools” in the game’s tools list).
- In Preferences → Paths, set the Assembly Kit path for the game.
- Regenerate the dependencies cache (Game Selected → Generate Dependencies Cache). When an AK path is set, its data is folded into the same cache — there’s no separate step.
The AK isn’t shipped for every game. For Empire and Napoleon there’s no AK to install, but archived AK definitions are available as an optional download through the Update Manager (About → Check Updates) — grab them from there if you mod either game.
7. (Optional) Telemetry & crash reports
RPFM ships with two opt-out toggles in Preferences → Telemetry:
- Enable Usage Telemetry — anonymous counters of which actions get used. Helps prioritise development.
- Enable Crash Reports — automatic upload of panic reports to Sentry when something crashes. Helps fix bugs.
Both are on by default. Turning either off takes effect immediately.
You’re set
That’s the configuration done. The rest of the manual covers what you can actually do with the program — start with The main window for an orientation, or jump to a specific editor if you know what you’re after.